
Here is a PDF of this manual -> Word butchered it into HTML.

Quadrowulf Software and Network
Configuration Notes
By Justin Moore
August 8, 2008
Based on:
Microwulf Software and Network
Configuration Notes
By Tim Brom – 5.16.2008
On this page I will be recreating what was done by Mr. Tim Brom at Calvin College
with Professor Joel Adams at this web page. I am going to try to be a bit more verbose in
my description of the creation of Quadrowulf.
That is not to say that Mr. Brom’s paper was not helpful, because it was
indeed helpful in the inspiration, creation, and implementation of this
project. This project was not really class
work related – more, I was interested in implementing it and my professor, Dr.
Hayden S. Porter, of Furman University, gave me a chance to build it for him. It should be noted that this project uses quad-core processors versus the
dual-core processors used in Microwulf.
Hardware Components
First, my hardware:

I have created a similar cluster to Tim’s, except that I have 2 layers
instead of four, and I’m using full ATX boards instead of m-ATX. So, this isn’t really “Microwulf,” but it’s
still very manageable to move around with just two people. Right now it resides on a cart, so it’s even
easier to move. See the Table 1.1 below for the part list that accompanies this
picture.
Table 1.1
|
Part |
Brand / Model |
Picture |
|
Motherboard |
Abit IP35PRO Off Limits |
|
|
Processor |
Intel Core2Quad Q6600 Overclocked to 3.2 Ghz |
|
|
Heatsink |
TuniqTower |
|
|
Thermal Paste |
Artic Silver 5 |
|
|
Video Card |
Biostar GeForce Series 6200LE [V6202EL – 63 VER:7.0] |
|
|
Network Switch |
Netgear ProSafe 24-port Gigabit Switch |
|
|
Memory (RAM) |
Corsair XMS2 DDR2-800 4GB [2x2GB] |
|
|
Power Supply |
Corsair VX550W Power Supply |
|
|
Network Cards |
Linksys 10/100/1000 Gigabit EG1032 PCI Cards |
|
|
Hard Drive |
Seagate 500GB Barracuda 7200.11 |
|
|
CD/DVD Drive |
Sony NEC Optiarc |
|
|
Network Cable |
I made them custom lengths |
|
|
Mounting hardware |
Rods/Nuts/Bolts/Washers |
|
|
Plexiglas |
Two sheets 3/8” thick |


I mention in the parts
list that I’ve overclocked the quad cores to run at 3.2 GHz in part because
some of the additional cost accrued is because we needed additional materials
to compensate the heat generated by the overclocked processors, e.g., the
snazzy Tuniq Tower heatsink and the Artic Silver
thermal paste. I am going to use
pictures to walk you through the installation process of getting a new node to
work properly, after all the steps have been performed on the head node, e.g.
setting up the DHCP server, NFS server, and the TFTP server.
Tim’s instructions
for installing the head node are great; my only modification will be that I’m
now using 5 Ethernet cards on the head node instead of 3, and 4 on each
diskless node instead of 2. I have
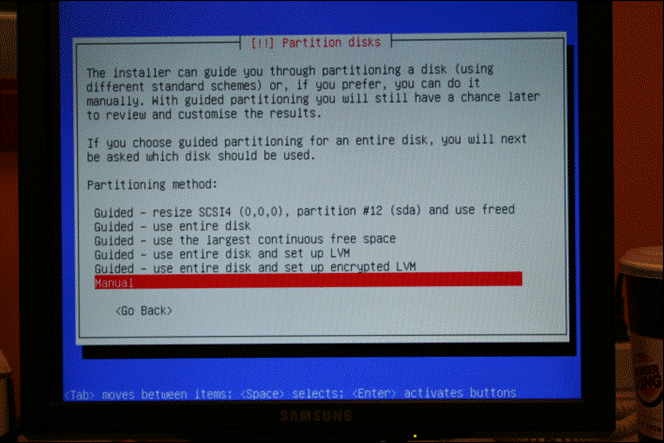
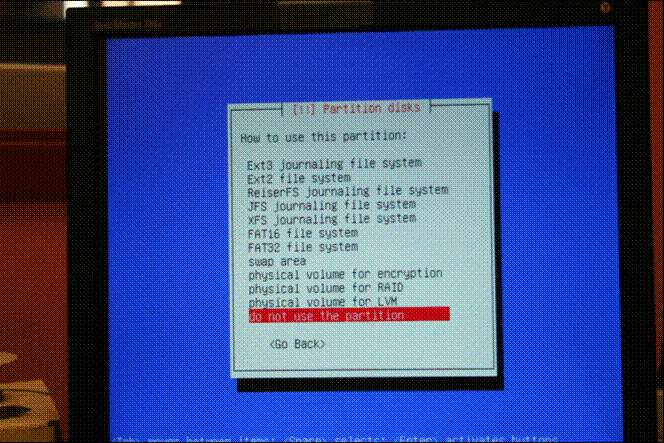
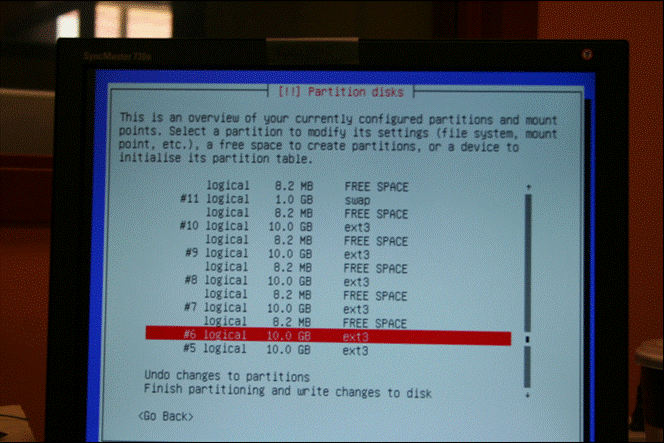
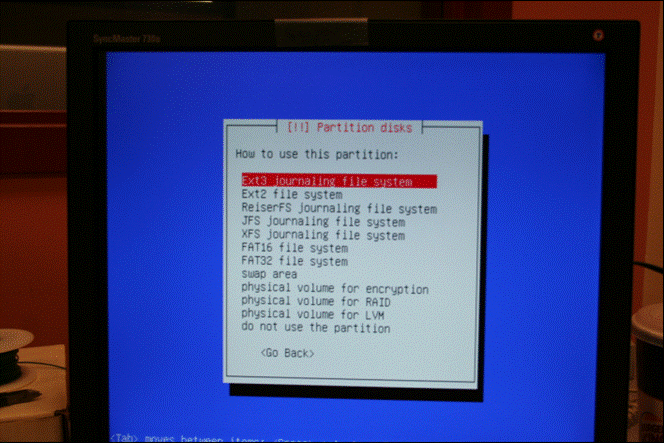
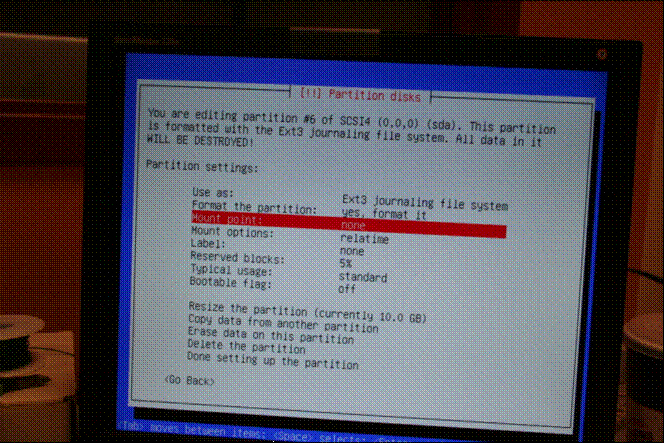
also partitioned 2x as many partitions on my drive because I wanted to make
sure that I can get 32bit version of everything working before I installed the
64bit versions. (: Professor Porter uses mpiJava, which somewhat
died as a project, so we have to make sure that still works.
It appears now that
I will have to leave it at the 32-bit version installed and let the next
contender work with the 64-bit OS.
Note:
I
changed the BIOS from hard drive recognition from IDE->AHCI because of a
hang problem with the Ubuntu installation disks. If when you put the disk in, it just randomly
drops to BusyBox after a long time (failsafe) then you should either change the
BIOS like I did, or pass a boot parameter to the Linux install disk that is
‘noapic’ or something along those lines.
Then it will work.
Diskless node installation
OK – now for the
installation of a headless node. Again,
I am assuming that you’ve already assembled the cluster and installed the OS
[I’m using Ubuntu 8.04 Desktop] on the head node (with suitable partition tables). Here we go.
Put the Ubuntu
Server 8.04 disk in the drive and reboot the head node.
:pix:


The next image should have the “YES”
highlighted, but I snapped the picture and hit enter before I realized it.


This next part is *CRUCIAL*
— Do not install GRUB,
it will overwrite what you have already done in installing the Head Node!
I just left the ‘how to update GRUB’
field blank and hit continue.


After the Install
I’m going to
outline the process for one node. After
you do the first node, you can either repeat all the steps, including the
installation, replacing every instance of “node1” with “node2”.
*Commands for the
Head Node / Master Node*
sudo mkdir -p /nodes/nfs/node1
Next we need to
update the fstab.
Update the fstab to
reflect your new partition.
/dev/sda6 /nodes/nfs/node1 ext3 noatime 0 0
Here is my complete
fstab on the Head Node / Master Node
|
# # # proc /proc proc defaults 0 0 # UUID=1aa2ddf9-f7f4-4f11-935e-000ebde2c5cd # UUID=a74802af-473c-46aa-bb70-90772ced1463 # UUID=cdc7f7ec-aafc-4875-9e02-e7066e5e7c7e /dev/scd0 /media/cdrom0 udf,iso9660 user,noauto,exec,utf8 0 0 /dev/sda5 /nodes/nfs/node1 ext3 noatime 0 0 /dev/sda6 /nodes/nfs/node2 ext3 noatime 0 0 /dev/sda7 /nodes/nfs/node3 ext3 noatime 0 0 |
Mount everything in
fstab by typing
sudo mount -a
If your
/etc/exports file does not look like this:
|
# # to # # # # # # # #
/usr /nodes/nfs/node1 /nodes/nfs/node2 /nodes/nfs/node3 /nodes /home 192.168.2.0/24(rw,no_root_squash,sync,no_subtree_check)
|
Fix it. (:
We now need to add
updates for the DHCP server so that it will find our new node when it boots.
For example:
host node1 {
hardware
ethernet 00:50:8D:BC:A2:32;
fixed-address
192.168.2.5;
option
root-path “/nodes/nfs/node1”;
}
Here is my complete
dhcpd.conf:
|
# # # # # # # #
# # # # ddns-update-style #allow #allow # option option option next-server filename
subnet range 192.168.2.2 192.168.2.200; option domain-name-servers option broadcast-address option routers 192.168.2.1; }
host hardware ethernet 00:50:8D:BC:A2:32; fixed-address 192.168.2.5; option root-path }
host hardware ethernet 00:50:8D:BC:9D:28; fixed-address 192.168.2.9; option root-path }
host hardware ethernet 00:50:8D:B7:71:22; fixed-address 192.168.2.13; option root-path } |
Restart the DHCP
server with:
sudo /etc/init.d/dhcp3-server restart
Now we have to make
some changes to the filesystem that was created with the server installation
cd, because there are certain settings that were put in that are not correct
with respect to that diskless node. For
example, the hard drive and the CD/DVDROM drive are set to mount in the node’s
fstab, but the node does not have anything connected to it, so those mounts
will fail.
*Commands for the
Headless Node*
We now change root
over to that new partition (we can pretend like we’re loaded on Linux on that
partition and begin to make some changes to the disk, even before the diskless
node gets a chance to boot)
sudo chroot /nodes/nfs/node1
/bin/bash
I get a weird situation when I try to
use tab completion, so I just type out the commands in full while chrooted.
Use your favorite
text editor to edit this file, I use vim – lots of people don’t like vim, but
whatever.
sudo vim
/etc/initramfs-tools/initramfs.conf
Look for the line
that says:
BOOT=local
And then change it
to:
BOOT=nfs
**Note: This next
section only needs to be done on the first node install. The other nodes can use the same initrd and vmlinuz – e.g. filesystem and kernel, respectively**
To know your kernel
version run the command
uname –r
Now, just realize
that the generated files of the next command will use that kernel name in their
filename.
sudo update-initramfs –u
This outputs two
files to the default location of /boot/initrd-img-KERNEL and
/boot/vmlinuz-KERNEL. Exit this by doing
exit
Now copy over these
files with:
sudo cp
/nodes/nfs/node1/boot/initrd.img-KERNEL_VERSION /tftpboot/
sudo cp
/nodes/nfs/node1/boot/vmlinuz-KERNEL_VERSION /tftpboot/
**Finished this
part on the first node – connect back to the chroot now**
sudo chroot /nodes/nfs/node1
/bin/bash
Please tell me you
made use of the up arrow and didn’t re-type that command. (:
Next I create
/etc/resolv.conf and put in the nameserver of the Internet connection on the
head node (so that I can have internet access through this chroot).
sudo vim /etc/resolv.conf
Place the following
in the file:
nameserver ip.address.of.your.dns.server
Next, let’s make
the fstab look right.
Comment out the
lines that begin with UUID= and /dev/scd0 – Use the # character at the front of
the line to comment it out. Add in the
following:
192.168.2.1:/usr /usr nfs defaults 0 0
192.168.2.1:/home /home nfs defaults 0 0
192.168.2.1:/nodes /nodes nfs defaults 0 0
Here is my complete
fstab for node1:
|
# # # proc /proc proc defaults 0 0 # #UUID=41b9f976-fa90-448f-9177-9929ba199aac #/dev/scd0 /media/cdrom0 udf,iso9660 user,noauto,exec,utf8 0 0 192.168.2.1:/usr /usr nfs 192.168.2.1:/home /home 192.168.2.1:/nodes /nodes
|
Be sure to leave
the trailing white line.
You can edit your
/etc/hosts file now, or wait until you get the node up and running, whatever
you fancy.
sudo vim /etc/hosts
Here’s my hosts
file:
|
127.0.0.1 localhost 127.0.0.1 HeadOfCluster
127.0.0.1 pc0 127.0.0.1 pc1 127.0.0.1 pc2 127.0.0.1 pc3 192.168.2.5 pc4 192.168.2.6 pc5 192.168.2.7 pc6 192.168.2.8 pc7 192.168.2.9 pc8 192.168.2.10 pc9 192.168.2.11 pc10 192.168.2.12 pc11 192.168.2.13 pc12 192.168.2.14 pc13 192.168.2.15 pc14 192.168.2.16 pc15 |
We need to create
the nodes directory – (otherwise there won’t be a place to mount to)
sudo mkdir /nodes
Next we need to
update the /etc/network/interfaces file so that it will automatically set up
our additional Ethernet cards properly.
*NOTE* I am still
experiencing a weird instance where the 3rd NIC on the system takes
control on boot and tries to get the NFS mounts. This causes an error because
that NIC is not supposed to be third.
Here is my
/etc/network/interfaces for my node1:
|
# #
# auto iface
iface address netmask auto
iface address netmask
auto
iface address netmask
auto
iface address netmask
auto
|
Finally, the Ubuntu
Server installation does not come with the NFS-common utilities, which includes
the binaries necessary to mount an nfs drive.
Imagine that! :\ Anyway, now that we’re using chroot on the
head node and we’ve created the /etc/resolv.conf
with the right nameserver, we can use the following:
sudo apt-get update
This will
essentially tell you whether your internet is working or not, but you should
see some stuff go by about getting package lists, now run the following:
sudo apt-get install nfs-common
Choose Y to install
– don’t worry about the fail portion of the “portmap” starting, after all –
we’re only on chroot, so the /proc directory is not mounted for this installer.
We are now finished
setting up the headless node. Get out of
the chroot by typing:
exit
Now we just need to
create the proper file in the pxelinux.cfg directory inside of /tftpboot with
the MAC address of the new node and I think we’re done! Here is my file for my node1:
|
default
label kernel append nfsroot=192.168.2.1:/nodes/nfs/node1 1
|
Let’s try it out!
There will be a couple bios changes before this will work – I’ll take some
pictures.
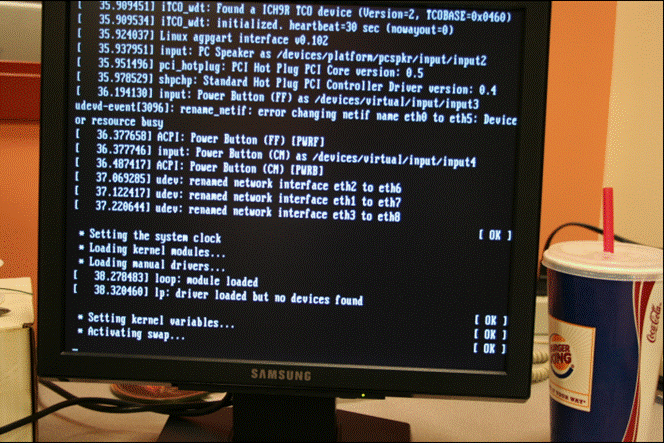
Here some of the BIOS updates I made:


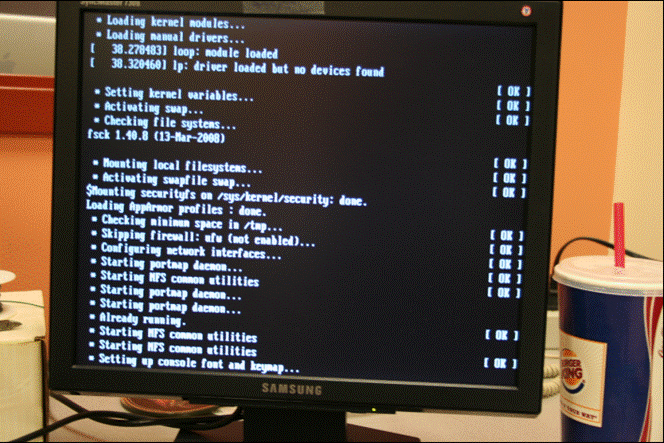
Here are some
pictures from after turning on the headless node.


There will probably
be an error here, that’s OK – we have now made it easier on ourselves to fix
the problem.
After the first
boot, when Ubuntu tries to set up the networking, we will easily be able to
modify instead of tying it all in manually.
Now we can fix the
network interface problem – Ubuntu automatically generates a list of udev rules
for networking cards based on the installation and MAC/hardware addresses. The problem is that we have different MAC
addresses for each card on each node!! So when the server tries to map out the
ethernet cards with the MAC addresses that were stored there when we installed,
those Ethernet cards are not on node1.
They’re residing on the head node, and so we get a weird renaming error.
So,
I was getting eth1 renamed to eth6, etc…
Here goes the fix:
We will have to
chroot over to node1 again from the Head Node.
We now change root
over to that new partition (we can pretend like we’re loaded on Linux on that
partition and begin to make some changes to the disk, even before the diskless
node gets a chance to boot)
sudo chroot /nodes/nfs/node1 /bin/bash
I get a weird situation when I try to
use tab completion, so I just type out the commands in full while chrooted.
The file is:
sudo vim /etc/udev/rules.d/70-persistent-net.rules
Remove the entries
that were there from the head node when we first installed and replace them
with the addresses of the cards that you know are in that machine.
We need to make
sure our network interfaces are set up properly, with the proper MAC addresses
and driver modules.
As an example, here
is my node1 70-persisten-net.rules:
|
# # # #
# SUBSYSTEM==”net”,
#other SUBSYSTEM==”net”,
# SUBSYSTEM==”net”,
# SUBSYSTEM==”net”, |


Now to installing LAM-MPI, JAVA, and
MPIJAVA
I installed both of
these packages, but I don’t think they’re having any effect, especially not
mpich – – because I explicitly compiled mpiJava with the LAM option instead of
the default mpich.
*JUST FOR
DOCUMENTATION – NOT USEFUL*
sudo apt-get install mpich-bin
sudo apt-get install lam-runtime
Now here’s the
rub. I’ve done most of the work already
in zipping up all the files I used, but here is how it goes.
First, I downloaded
mpiJava — http://www.hpjava.org/mpiJava.html
Then I downloaded
LAM-MPI — http://www.lam-mpi.org/
Then I got several
version of the JDK – 1.4.2 , Java5, and Java6
The configure
options for lam-mpi are in Jeff Larkin’s paper [page 16], though I didn’t use
the Fortran compiler option, so –without-fortran (or
something like that) was passed as a parameter.
Unzip the java jdk
and put it somewhere in /usr ( I chose /usr/lib/jvm/)
Then, make sure you
get these 3 things for building lam-mpi:
sudo apt-get install libc6-dev gcc
g++
installing mpiJava only consists of passing in the
jvm location (/usr/lib/jvm/jdk1.6.0_07 for me.)
you have to:
./configure –with-mpi=lam
or something along those lines
then once the configure is done you have to
sudo make
then the mpiJava/src/scripts/prunjava file
(which actually runs the java MPI calls) has a parameter location for the jvm
(same as above). Also, I added in the
–xms128 –xmx1024 command to increase the heap size though it didn’t seem to
matter for gsky tests.
To run gsky:
Edit StarMPI.java
to change any of the parameters to what you want – this is
/home/jmoore/Desktop/mpiJava/examples/starArray/
There is a file in
there called machines which looks like this:
|
HeadOfCluster Pc4 Pc8 Pc12
|
This has the
hostname / cpu count for the entire cluster
Kick off LAM by
running
lamboot –l machines
The –l parameter is
crucial because otherwise it will complain about localhost resolving, and if
you take localhost out it will complain that localhost is not in there. Catch 22.
The –l says “hey
stop being a moron and just use the /etc/hosts file that I provided for you.”
That command should
come back without any errors, and probably only spit out one line of text
You can pass –v if
you want verbose or –d if you want debug
Then edit RunTests
script to make sure that the number of procs param nprocs is less than or equal
to the number of processors in the machines file. Ie, in this case if yours
looks like mine above then it should be 16.
Then execute the
runtests script by:
./RunTests
Viola.
If you have
writeToFiles Boolean on then you should get some output in /tmp – if not, you’ll
just get visual cues that the software is running because …… will fill the
screen and you’ll see the timing analysis breakdown when the program is
finished.
***BOOTING NOTES***
If you have
problems booting the node just reboot it. Sounds cliché,
sure, but whatever.
The third or fourth
NIC occasionally decides that it wants to take control despite the fact that
the node had to boot from the first NIC and it also received DHCP on the first
NIC.
Go figure.
Anyway, if you see
“SKGE” loading as a
driver right before the node tries to get the NFS scripts, then
just restart the node.
I call it skeegee,
and I hate skeegee.
Reboot and you
should get something like r#### — that is good. The onboard NIC cards are RealTek or
something like that – so the r driver loading is what you want.
Reboot till that
happens.
SSH KEY GENERATION
http://linuxproblem.org/art_9.html
<![if !supportLineBreakNewLine]>
use that.
If you’re adding
nodes or logging in for the first time, make sure that you do login via ssh once before you kick off lamboot. If any kind of message
comes back from the server then it will error and you will get pissed.
There’s an error
like “this mac address is new, are you sure you trust this source” or some shit
like that.
Just say yes and it
won’t happen again – and subsequently you can boot this node now with lamboot.
Leave a Reply